

CDL Pre-trip Inspection Test
One element of testing that you will be required to master is the CDL Pre-Trip Inspection. It will be a required part of your CDL testing program. Each truck driving school will teach you in the manner that they have come up with that has proven effective for enabling their students to pass the cdl exam. As such, each will vary slightly according to the State that you test in and best practices for passing that the school has come up with.
The purpose of this article is to familiarize you with the test itself, and to give you some practical testing tips that will be universal in nature to help you pass your exam. Always refer to your school’s testing and training policies as they will show you the most effective (and more importantly) tried and true ways to pass at the location where you will be tested.
What part of testing does the Pre Trip inspection test fall under
If you have read our other articles on CDL testing, you will recall that the first step is to take and pass your CDL permit test. This test is classified as a knowledge test and is the written portion and is conducted usually on paper or computer. Passing the knowledge portion enables you to receive your CDL permit and begin learning the other portions required for obtaining your Class A or Class B commercial driver’s license.
After passing your knowledge test and getting your permit, you move on to learning the lessons taught at your CDL School. The majority of those trainings will be geared towards teaching you how to pass the CDL skills test or the practical applications of driving a truck.
The three components of the CDL skills test are:
· Pre-Trip Inspection – to see that the vehicle is safe to drive
· Basic Vehicle control – this is the skills pad portion: moving the vehicle forward and backward within a defined (coned off area), backing maneuvers etc.
· And lastly – On road driving test
What is the reason for a Pre-Trip inspection?
You must show the test examiner that the vehicle is safe to drive and free of any mechanical defects that will affect the safety, and drive-ability of your vehicle.
Pre-trip inspections will continue into your career and are required as part of your duties.
What will I do during a Pre-Trip Inspection?
In general terms, you will approach the vehicle you are inspecting from the front, and will start your inspection there. You will systematically inspect and check the following major areas of your vehicle:
· Front of the vehicle
· Engine Compartment -Passenger side
· Engine Compartment – Driver side
· Drivers side of vehicle
· Driver’s side steering axle/door area/frame
· Driver’s side coupling devices
· Driver side Rear of Tractor
· Driver side trailer components and axle
· Rear of Trailer
· Passenger side trailer components and axle
· Passenger side Rear of Tractor
· Passenger side coupling/steering axle/door area and tractor frame
Note: This is not meant to be a comprehensive list. For all intents and purposes the examiner will not make you check components that are available on one side that area identical on the other side.
See the diagram in the next section for further clarification.
CDL Pre-Trip Inspection Diagram
This diagram was taken directly from the CDL handbook. This handbook is a standardized version that multiple states have chosen to utilize. It can act as a cheat sheet for reminding what areas/components to check for the test.
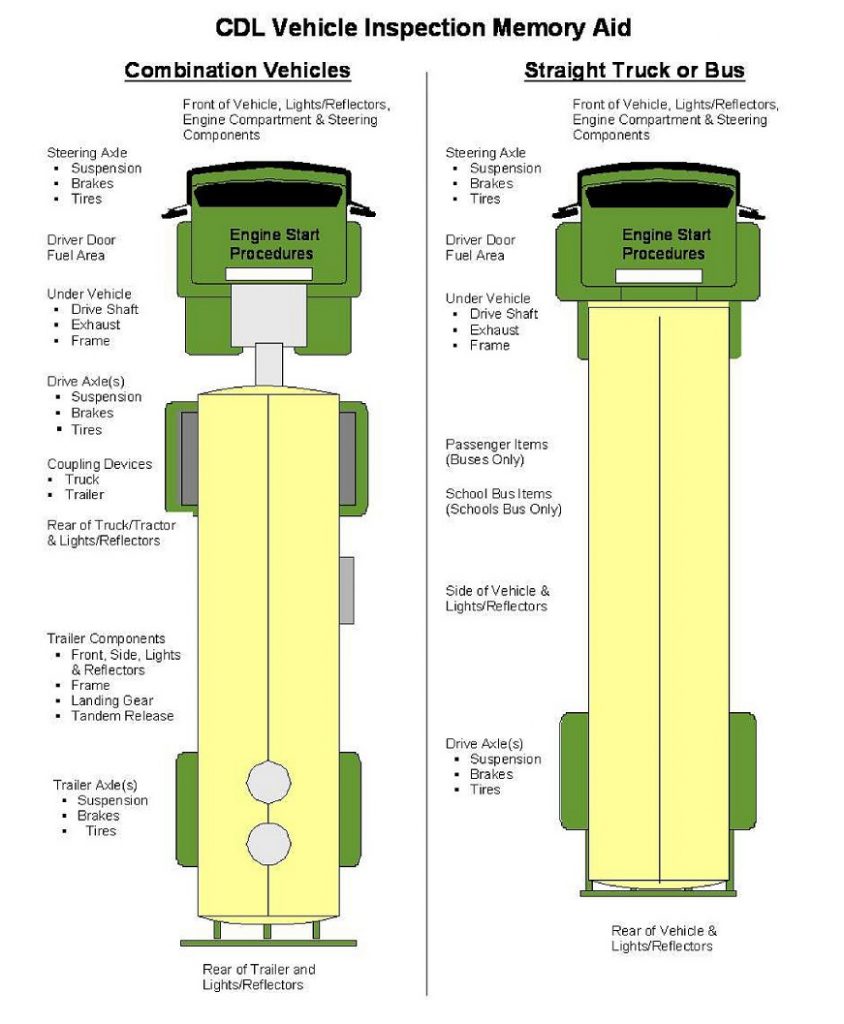
pre trip inspection diagram
You will have to point to or touch the components that you are checking, and explain to the examiner what you are checking and why. You will not have to crawl under the vehicle as part of the test.
CDL Pre-Trip Inspections – The Basics
The following video will guide you through the basics of a pre-trip inspection. It was conducted on a Class B straight truck, however don’t let that stop you from viewing the movie even if you are testing for your Class A license. The instructor has a fantastic way of explaining the process and showing what the examiners are looking for.
This video was brought to you by the CDL college, you can find more information about them on our page here.
In addition, let this be a great introduction to the Pre-trip inspection process.
Video 1 – Pre-trip inspection
Pre-trip inspection video notes:
Phrases that help to pass:
If a part is – Metal or Plastic: Key words: Not Bent, Broken or Cracked. Securely mounted to the vehicle.
Any part with Fluid: Key words: Not Bent, Broken or Cracked. Securely mounted to the vehicle. Adding : No Visible Leaks.
Any part with Air: Key words: Not Bent, Broken or Cracked. Securely mounted to the vehicle. Adding: No audible leaks.
Any part made with Rubber: Key words: No Abrasions, Bulges, or Cuts. Securely mounted to the vehicle.
Patterns for inspection:
Start at the top and work your way down from left to right.
Inspection Notes:
Please keep in mind the notes included in above (Not Bent, Broken or Cracked, Securely mounted to the vehicle – No Abrasions, Bulges or Cuts etc. as well as all the other key words used in the inspections). I will illustrate the parts and order that they were inspected on the video as well as any additional information that was added. Do not use this as your only reference to study for your Pre-trip inspection test. Make sure you utilize what your school provides and also follow their instructions (as they will be giving you the information needed to pass at your local school – they know what the inspectors are looking for and the exact wording to use).
Inspection:
Approach the front of the vehicle. Point to, touch or demonstrate how you know the item is in good and safe working order. You must identify all defects to receive credit.
Front of Vehicle: Looking for the 3 L’s. Lights, Leans, and Leaks. Open hood and approach the passenger side of the engine compartment. You are inspecting the 3 Engine components, 3 Fluids, general hoses and belts.
1st Fluid: Coolant reservoir, key word: “Fluids in operating range”.
1st Component: Alternator, Belt Driven – advise condition – Key words: No more than ¾” play in belt.
2nd Component: Water Pump, Large hose from bottom of radiator leads to it. Belt driven.
Do a general hose – No abrasions, no bulges and no cuts.
Move to driver’s side of engine compartment – Start at the top::
2nd fluid: Oil level – describe procedure to check oil: “Operating range – at or below full, but above add”.
3rd Fluid: Power steering reservoir, “Operating range”.
Power steering hose
Air compressor – Not bent, broken or cracked, securely mounted.
Next is Steering System:
Inspecting: Steering shaft – then steering box. Next, Pittman Arm, drag link, upper steering arm, lower steering arm, lower drag link.
Suspension System:
Inspecting: front spring mount, springs (aligned no scissoring) 2 U Bolts, Shock absorber, and Rear spring mount.
Next area to inspect – Braking system, Wheel and Tire:
Start at air lines, Brake chambers or cannisters, Slack adjuster and rod, Brake shoes (Not bent, broken, or cracked – adding: Not dangerously thin, min. of ¼” thickness – No sign of heat or glazing, free from oil. Next – Brake drum, inner wheel, inner side wall tire, Tire treads – adding: evenly worn min. 4/32” on tread depth. Next – outer side wall, outer wheel, valve stem (tire pressure) lug nuts, and hub seal (not leaking).
Next area to inspect – Form 2 (Side approach).
Inspect the driver side of the vehicle – Anything unique to this side of the vehicle, and rear axle:
Mirror bracket, door and door handle, inner door handle, door hinges, door seal, steps, fuel cap, front of trailer box, side of trailer box, lignts on side, truck frame – key words: Not bent, broken, or cracked, securely mounted and everything is securely mounted to it. Next – Drive shaft, exhaust (No Leaks)
Rear suspension: Front spring mounts, springs (no scissoring) 2 U bolts, other spring mount.
Rear braking system: Air lines @2, brake chamber, slack adjuster and rod, brake shoes, brake drum.
Rear wheels and tires: Inner wheel, inner sidewall, tread (both tires) on rear min. 2/32” tread depth, 2nd inner side wall, inner wheels – between wheels no gap or debris, outer sidewall, outer wheel, valve stem/tire pressure, lug nuts, hubs/axles, and mud flap.
Next area to inspect – Rear of Box:
Lift gate, door latch and seal, reflective tape, and lights and reflectors.
Next – External light check:
Tester will verify each light as you call them out:
Put the key in the ignition, turn the key on (motor not running) turning the lights on:
Inspecting: Clearance lights, head lights, brights, right turn signal, left turn signal, 4 ways, side of vehicle clearance lights, side rear left turn signal and 4 ways, rear of vehicle clearance lights, tail lights, brake lights, rear right turn signal, rear left turn signal, 4 ways, passenger side of vehicle clearance lights, right side turn signal and 4 ways.
Next part – In Cab Inspection:
First inspecting the 5 areas of safety:
Seat belt, spare fuses, fire extinguisher (fully charged, securely mounted, correct type), 3 red triangles, and City/Highway horn.
Next: Mirrors (clean, no illegal stickers) and Windshield (clean, no illegal stickers).
Next portion- 9 items inspected with the key in the ignition, turned to on position, with engine off:
Checking: ABS dash light, heater and defroster, windshield wipers/fluid, dashboard, indicators, left turn signal, right turn signal, 4 ways, and high beams.
Next: Safe start (Parking brake set, vehicle in neutral, clutch depressed)
Turn on vehicle: Inspect instrumentation in a “W” format.
Gauges: Oil pressure, water temperature, volt meter, 2 air gauges.
Brake test:
Parking brake: Engaged (verified it works through the tug test). Service brake (brake pedal) – move forward about 5 feet and then stop- leaving the vehicle in gear and turning the motor off while stopped.
Turn key back to on position – completing the applied test (for leaks). Can n ot lose more than 3 psi in one minute (all while holding foot on brake). Next checking low air pressure warning – buzzer and light come on below 60 psi, next checking emergency and spring brakes by pumping down brakes to 40 psi and brakes applicators pop out on dash.
Next, do another safe start of the vehicle – for air pressure check. Raise idle and build air pressure. When you get to 85-100 psi count.. continue to build air pressure to between 120-140 psi at which time the governor will kick on.
***Note: At this time you may inspect any items that you missed or skipped at any point during the test so that you don’t have points deducted.
Video 2 – Pre-trip Inspection
This video was brought to you by our friends at STLCC. You can find more information about them here.
Pre-trip Inspection video #2 Notes:
Inspect: Front of Vehicle
Approach front of vehicle, wheels chocked, keys in pocket
· Check for puddles, and dripping fluids
· Clearance lights – Amber in color, clean and working
· Headlights – clean and working
· Turn signals – amber in color and clean
· Nose mirrors and mounting bracket
· Pop the hood and check windshield
· Wiper blades and arms
Inspect: Engine compartment – Passenger side
· Radiator/ Coolant reservoir
· Hoses – not leaking
· Alternator – properly mounted and secured
· Alternator belt – No more than ¾” play
· Water pump – properly mounted and secured
· Water pump belt
Inspect: Engine compartment – Driver Side
· Fan blades/shroud
· Power steering fluid
· Power steering hoses
· Power steering pump
· Air compressor
· Engine Oil
· Steering Column
· U Joint
· Steering gear box – No missing bolts or cotter keys
· Pittman Arm
· Drag Link
· Upper and lower control arms
· Tie Rod and Tie Rod ends
· Joints and sockets – not worn or loose
Inspect: Suspension System
· Leaf spring
· Leaf spring hanger
· U Bolts and saddle
· Shock absorber
Inspect: Braking Components
Remember the acronym CHADS:
C= Chamber (brake chamber)
H= Hose/Line (air brake hoses and lines)
A= Adjuster (Slack Adjuster and push arm)
D= Drum (brake drum)
S= Shoe (brake shoes)
Inspect: Wheels
· Steer tires – 4/32” minimum tread depth
· Side wall – No ABC’s (Abrasions, bulges, or cuts)
· Aluminum rim
· Lug nuts
· Bolt and bolt holes
· Outer wheel seal
· Valve stem/cap
Inspect: Side of Truck
· Turn signal – amber in color
· Mirrors and mounting bracket
· Door hinges and seal
· Fuel tank/cap
Inspect: Rear of Tractor
Remember this acronym- A –G (A through G)
A= Air/Electrical lines
B= Battery.Battery box
C= Cat walk/ steps
D= Drive shaft/coupling
E= Exhaust
F= Frame/cross members
G=Gladhands/ Pigtails
Inspect: Coupling System
· Apron
· Skid plate – secured with mounting bolt and cotter key
· Platform – and mounting bolts and nuts
· Sliding rail- properly mounted and secured to the frame
· Locking pins – fully engaged
· Air lines- not leaking
· Kingpin
· Locking Jaw
· 5th Wheel release arm
Inspect: Rear of Tractor
· Mud flaps
· Tail lights, brake lights, and reflectors
· Reverse light
· Cross member
Inspect: Suspension system
· Leaf springs
· Spring hangers
· U Bolts and saddle
· Air bags
· Shock absorbers
Inspect: Rear Tractor brakes
Remember the acronym CHADS:
C= Chamber (brake chamber)
H= Hose/Line (air brake hoses and lines)
A= Adjuster (Slack Adjuster and push arm)
D= Drum (brake drum)
S= Shoe (brake shoes)
Inspect: Rear Tractor Wheels
· Space between dual tires – no debris
· Drive tires – 2/32” minimum tire tread, even wear
· Sidewalls – No ABC’s (abrasions, bulges, or cuts) * Check all sets of tires same way
· Rims
· Lug nuts
· Bolts/Bolt holes
· Outer wheel seal
· Valve stem and cap
Inspect: Front of Trailer
· No damage, cracks, holes, etc.
· Top clearance lights
Inspect: Side of Trailer
· Reflective tape around side
· Landing gear support frame
· Landing gear legs
· Crank handle
· Side clearance light
· Frame/cross members of box floor
· Side turn signal – amber
· Air lines – 18” off ground (not leaking)
· Tandem release arm
· Locking pins
Inspect: Suspension on Trailer
· Air bags
· Shock absorbers
· Braking components (CHADS)
Inspect: Trailer wheels
· Space between – no debris
· Tread depth
· Sidewall – No ABC’s (abrasions, bulges, or cuts)
· Rims
· Lug nuts
· Bolts and bolt holes
· Outer wheel seal
· Valve stem and cap
· Mud flaps
· Door ties
· ABS light
· Back clearance light – Red in color
Inspect: Rear of Trailer
· Top clearance lights
· Doors – open, close and latch properly
· DOT reflective tape
· Tail lights, brake lights, clearance lights
You will then ask the examiner to assist you in checking all exterior lights
Video 3 - In-Cab Inspection
This video was brought to you by our friends at STLCC. You can find more information about them
here.In Cab inspection video Notes:
Inspect:
· 10 Lb Fire extinguisher
· 3 Reflective triangles
· 6 spare fuses
· Seat belt – No rips, tears, frays, and it latches and unlatches properly
Perform: Safe start
· Foot on clutch
· Gear in neutral
· Brakes set
· Key turned to on position to start truck
Inspect: Instrument panel/gauges
· ABS and other warning lights – they come on and then go off
· (Turn on Truck) at this point
· Gauges – Oil, pressure
· Water temp gauge
· Volt meter
· Primary and secondary air gauges
Inspect: Lights and Horns etc.
· Headlights
· Left turn signal
· Right turn signal
· Hi beams
· Wipers
· Washers
· 4 way flashers
· City horn
· Air horn
· Steering wheel free play
· Heater/Defroster
· Windshield
· Mirrors (properly adjusted)
Perform: Brake Test
With the engine off, turn key to the on position.
Release brakes
Put foot on brakes – No more than 4 psi loss in 60 seconds
Next – bleed brakes (low air pressure warning should come on before 60 psi)
Continue fanning brakes down until the spring brakes engage (somewhere between 20-40 psi)
Now: restart truck to rebuild pressure
Idle until the air builds back pressure (at around 120 psi air governor kicks on)
Next – Tug Test
After removing wheel chocks:
Release tractor brakes to test trailer brakes attempting to pull forward (should be a tug but no movement)
Next set tractor brakes and release trailer brakes, attempting to move forward (Again, there should be a tug but no forward movement)
Release both brakes and move the vehicle forward about 15 feet, and then apply the service brake (brake pedal) to test that brake (the vehicle should stop).
This concludes the test.
Conclusion
This article should give you a complete introduction to Pre trip inspections and allow you to become familiar with the process of what is tested on. For further assistance make sure that you pick up a copy of your State’s CDL manual and locate a CDL school near you.
Don’t forget to check out our other articles and please pass the word about our website!